

There was a time when bicycles were lovingly handmade by artisans who themselves loved the sport more than those for whom they built the machines. Lugs were filed to become Luggs; chain and seat stays were beautifully chromed for durability despite the grams it added to the frame’s final weight; spokes were chosen for their purpose and laced to hubs and rims in a pattern that suited the specific purpose the wheel was intended to serve. Throughout the process – from building the frame to manufacturing of the components – extra care was taken to make every element of the bicycle beautiful; these bicycles, when you are in their presence, radiate La Vie Velominatus.
As was customary at the time, components would be pantographed and frames repainted and rebranded, leaving behind little evidence of their origin. But hidden in the components and frames were symbols that the manufacturers stamped into their wares to preserve their identity; Colnago their Fiore, Cinelli their C, and Campa their Shield. These symbols have come to hold great meaning within the sport and we of a certain ilk scour the photos of our heroes’ bikes for evidence of their existence.
For a variety of reasons including cost, proprietary tube-shapes, and repeatability of production, these practices have largely died away in mainstream bicycle manufacturing; in fact, nearly every element in the art of bicycle building that requires attention and skill is slowing being eliminated from the craft. Ahead-set stems have replaced the need for a carefully adjusted headset and stem, sealed-bearing bottom brackets and hubs have eliminated the subtle touch required to hold a race in place with one hand while tightening the assembly with the other. By and large, the machines and riders are stronger than the terrain they race over, leaving little practical need for the attention to detail and customization that once came as a matter of course.
There is, however, one magical week of racing where the terrain is still stronger than the riders: the cobbled classics of de Ronde van Vlaanderen and Paris-Roubaix. This is the one week during which the Pros still require highly customized machines and we, as fans, can scour the photos of our heroes’ kit, looking for the symbols tucked away in the components to discern their origins. One such symbol is the brass badge affixed to the valve-hole on Ambrosio rims.
These rims are chosen by the Specialists for their strength on the stones regardless of what wheel sponsorship obligations might exist within the team. Their mystique is further deepened for those of us living in the States because they aren’t available here. It follows, then, that the Golden Ticket, as I call it, is something I’ve coveted for as long as I can remember (which, admittedly, isn’t very long and, upsettingly, keeps getting less long) but have never had a good enough reason to justify procuring from Europe. But Keepers Tour, Cobbled Classics 2012 provided the perfect justification to go about finding a set and I wasted no time in doing so. Upon arrival, the rims spent the better part of two weeks sitting in my living room or next to my bed, patiently waiting for me to pick them up and rub my thumb over the badge, just to reassure myself they were still there.
Not long after the rims arrived, I excitedly loaded a picture of Boonen in the 2010 Ronde and turned the laptop to show my VMH.
Frank: Hey, what do you see.
VMH: Boonen. Goddamn, he’s a stud. Don’t let me too close to him; I can’t be responsible for my actions.
Frank: What about his wheels.
VMH: What?
Frank: Don’t you see? He’s got my rims.
VMH: You can’t possibly know that.
Frank: Openly shows his exasperation by groaning audibly and rolling his eyes. Yes, I do. Check it. You can see the Golden Ticket on his back wheel. Its obvious as shit. What’s wrong with you?
VMH: Sighs, pours another glass of wine. Exits stage left. Hopefully not for good.
*Coincidentally, on the same day that this article was being written, Inrng published a similar (better) article on a related subject of hand-built wheels. Well worth the read: The Dying Art of Wheelbuilding

@xyxax
Thanks, I’ve found both The Art of Wheelbuilding and The Bicycle Wheel for download on the same site. Looks slightly sketchy and Russian. Feels a bit like a Rule 58 contravention.
For anyone in the states needing matériel with which to practice their wheel building!
@Ron
I set my saddle height so it feels the same on my bikes. I have come to the point where I judge what’s right by whether I am getting natural ankling in the pedal stroke. If the saddle is too high, when I get back from my ride there will be no soreness in the calves from proper pedaling technique. If it’s too low I’ll feel it in my patellae. The sweet spot is a matter of 2-3 mms.
@Ron
I usually run a level across the top of the saddle and measure from there to the centre of the bottom bracket axle. Using your number one bike as the reference, I would add saddle height for shorter cranks and reduce with longer cranks; i.e. if No.1 bike has 175mm cranks and No.2 172.5s, I would raise No.2 saddle 2.5mm. This keeps leg extension the same at the bottom of the stroke, but be aware that it does affect it slightly at the top of the stroke – if the crank length difference was greater than 10mm I think I’d split the difference.
Saying that however, I never changed seat height between bikes and have never had an issue at all. Some people are more prone to problems than others with such minute changes.
@Oli
What Oli said.
@eightzero
Last time I was in this situation I found that slipping a new pair of cable cutters into my sensei’s toolbox as he was leaving made him eager to come back for another round of brews and bike building, but good luck finding a tool frank doesn’t already have, or that won’t require you to take out a second mortgage.
@Chris
Harasho, komrade.
The intro and scaler’s bit about his first race bike takes me back to the same era-ish. 1984-5, bought the LBS owner’s old raleigh international from bout 1973. sadly(albeit made it affordable) he had converted it to a touring triple workhorse, stripped of most of its racing gear. But reynolds 531 w/ unbelievable shiny detailed chrome lugs, campy dropouts, chrome underneath the gold-green paint. like most teen boys in semi-rural ohio, neglected for 4 wheels at first opportunity, and then “gasp!” TRADED at a substantial loss on a new mongoose MTB w motorcycle handlebars etc circa 1987. Every now and then get a nostalgic twinge to find a replacement, but perhaps better as a memory…
@gaswepass
Got an e-mail out to a guy that ‘claims’ he has a Cinelli Cent. for $200. In a 57cm no less. If this is indeed true, it’s mine! Need photos of course.
ironically, googled the international, and raleigh has brought the model back for 2011- reynolds 853, dura-ace and over 5k. found pics at sheldon brown site of the original, the color was champagne to be accurate.
@frank
No offence taken. I suspected a degree of deliberate provocation. However I’m sure I can provoke genuine outrage after you’ve seen the size of my EPMS! On another note relevant to various posts above; this is the frame I’m so glad I didn’t get rid of when I ‘upgraded’. But that’s another, rather long story and I’m off to bed. See you in the morning.
@razmaspaz
Ah ha. Good to know. There are clearly subtle nuances on the Path of the Velominatus.
@jaja
Whoa, that’s like elephantiasis of the EPMS…
@ frank: that is just right!
I have built a few of my own wheels, and true my pre bought stuff regularly.
on the soldering, everyone says don’t (scaler et. al.) and its true, the solder stiffens the wheel. But, consider, it will also maintain trueness better for the pave, and that is a reason the hardmen would do this, not to mention when they shoot their fuckin guns, they go straight down the road like they’ve been shot.
I would use some lite blue spoke prep, it will give the brass a bite. Now, I know there will be dissention within the ranks of Cognoscenti, but the journeyman wheelbuilder that personally taught me in 1998 how to, said spoke prep and that is goood for me. I have never had prob, and only apply an oil on truing days.
the double butted spokes are a must, 15/16g are the strongest and dt swiss are phenomenal and yes, brass is the only way to go.
Since your pimpin Ambrosio’s gold stars, FMB tyres, and all, I just assumed you must do it all Belgian style and would go w/the solder. Look at the PRO’s on the Roubaix, many of them have soldered. Call competitivecyclists, they offer a set of solder, or read their review about them, they said they killer.
But, given the bikes we have today, carbon and all, the ‘not to solder’ is probably the smartest so they do soak up the pave’, given the week of riding your going to be hammering.
whats the growth coming off that saddle???
Oddly enough, I built a rear wheel yesterday – ambrosio excellent, ultegra hub (which is a lot nicer than I thought it would be, and a little lighter than the several-year old dura-ace it’s replacing) 36h 3x – I don’t think there’s ever an excuse for anything else on a box-section road-bike wheel, is there? I’ve built a radial front and wish I hadn’t, 3x not only looks better to my eye but is less dependent on the correct tension to build a good wheel, it’s got to be tight on radial for it not to roll like a bag of shit. I don’t have a wheeljig or a tensiometer or nuthin’, I turn my bike upside down on the dining table and use my thumb and musician’s sense, although you’d worry if you heard me play the guitar. The brandt book is good and probably required reading at some point but most of it (from recollection – it’s been 20+ years…)is theoretical discussion of the physics of bike wheels and spoking patterns for tandems…
My understanding of double-butted spokes vs plain gauge is that not only do double-butted spokes flex more, but the added elasticity in the middle of the spoke helps them absorb and deal with spoke twist during the building process. I used straight gauge spokes for this build – I figured on two things – first, it’s 36h anyway so the difference in the amount of flex from the spoke type vs the right tension (even rather than too tight) would be minimal, and 2nd, plenty of oil on the nipple during the build would eliminate any twist.
Something that I used to do when I built wheels for other people was to, after finishing truing the wheel, grasp the rim at various points about it and apply a moderate twist to it. The guy who taught me said that this mimicked the first couple of hundred k and showed you where the rim wanted to sit with how you’d trued it – you trued that, the theory went, and you were close enough. If it’s a wheel for myself I don’t bother, I just get it close enough, do a couple of rides, and then get anal…
[album: http://filemanager.dutchmonkey.com/photoalbums.php?currdir=velominati.com/wp-content/uploads/readers/Simon/2011.12.07.23.55.05/|width=595|height=512]
^ I feel duty bound to point out that it’s an effect of the angle the photo was taken from and the lean of the wheel – my levers aren’t really that high on the bars…that would be wrong…
@Oli
Sage advice. Also keep in mind that difference in setback will make differences in leg extension as well. Its a massive hass and depending on how picky you are comes down to what @Nate says.
Ultimately, getting your position right between bikes is very hard and takes lot of attention. In the end, what “feels” the same is more important than what “measures” the same. This, by the way, is why I got the Solist. I can now switch between Bike #1 and Bike #3 with (almost) no issue. Same saddle, bars, stem tape, crank length, pedals between bikes. Still, now I’m perplected by how different my wrists are angled when switching between the Record on #1 and STI on #3.
Ah well, the show must go on. Pros travel with their saddle and seatpost and leave bikes in various locations. This makes me feel better.
@frank
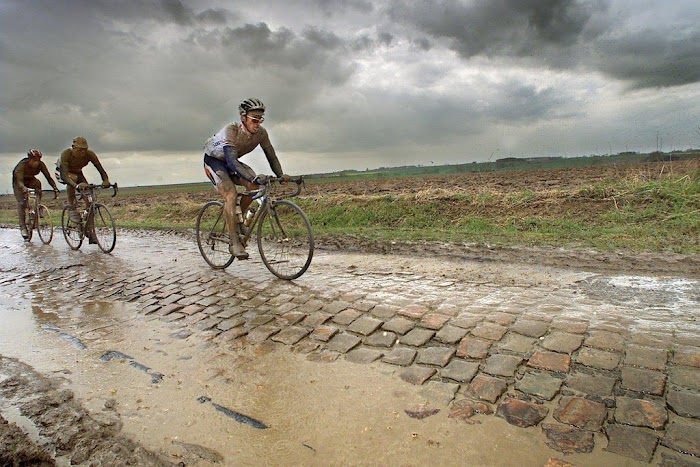
I bet you and those attending the Keepers Tour will dream of this
Dont know anything about this picture except that your rims are in it.
@Simon
I could look at that first photo all day (well apart from the hideous bricks), that is simply the definition of what a road bike should look like.
Nice. The question is though, once you’ve conquered the Arrenberg do you cleanse them of the lowland mud for commuting or retire them to a special place of reverence in the VVorkshop only to roll again on the hallowed roads of a contintal Classic in years to come?
@scaler911
@scaler911
Don’t solder! I went nuts soldering most of my wheels as junior, and guess who had the most broken spokes! – The kid with the soldered spokes!
One thing that was cool – back in the day, was to balance the wheels by wrapping thick solder around the spoke. Spent many an hour on the LBS truing stand!
Back to your wheel build, I’d be using plain gauge stainless steel, 3x.
How many holes in the rims? 32 minimum, 36 tough as!
I’m looking forward at having a go at building my own wheel over the next few months. Tips listed by all are great.
People better stop posting photos of their shiny, shiny Pinarellos round here. Makes me angry. And a little bit sad. But mostly jealous.
@minion
Nipple Lube
Ahhh, The road bicycle wheel. Take a deep look now. Breathe it in. Imbed it in your mind’s eye.. Fall asleep to it after a long day rolling on them. I hate to say this but their pure aesthetic is all about to be completely ruined by the disc brake and the superpowers that be. On a Mtn bike wheel? OK.. A CX wheel? Yeah, well..
A road bike wheel in it’s purest form.. The disc brake is complete blasphemy, especially on the front end.
@frank
I must be on another of my curmudgeonly streaks. I have also been off about an n+1 fantasy focused on custom steel lately.
@Simon
Great advice, and sweet bike!
Agree.
@wrench
Way to further segment the cross market from the road market IMO.
This is all getting a bit weird. First Frank posts about wheelbuilding on the same day as Inrng and gives a namecheck, then the next day Inrng (re)posts about looking good on the bike and references The Rules.
http://inrng.com/2011/12/getting-the-euro-look/
I like the guy who says he swaps his bottles to the right colour if he decides to ride a different bike. He belongs here.
@Simon
Sorry, but you’ve committed a cardinal wheelbuilding sin – you have the spokes pulling together at the valve. Good effort on building your own wheels, but the devil is in the details.
@sthilzy
Plain gauge is for agricultural tractor wheels, butcher bikes and kids bikes not classics wheels. 2.0/1.8 double-butted spokes are the business.
@Souleur
It’s a Carradice Nelson Longflap: http://www.carradice.co.uk/index.php?page_id=product&under=type&product_id=37
British tourists of a certain generation would have you believe that you can fit all you need for a ride from London to Istanbul in one of those. However, as you can see I have it pretty full just going to work and back.
@jaja
Nice bike, although it needs Fairy liquid flaps attached to the mudguards to complete the P-B-P look.
I’ll be turning up to the Keepers’ Tour on a slightly more modern equivalent. Will bring mudguards too, just in case.
Let he who scoffs be sure never to suck my wheel.
@Frank @All
This is great article and a problem that is very close to my heart and extended to many areas of life. Where the expert craftsman in their trades have been dropped in a drive for efficiency and savings which has resulted in a gigantic drop in quality of goods. Another example non-cycling related is fishing poles, which i do enjoy also. It took me many years to find a craftsman who would hand make me a fly fishing pole and was extremely happy with the results. There are many other items I have over the years found real craftsman to provide me with such as suits, shirts, shoes, saddles, furniture etc and there is without a shadow of a doubt magnitudes of difference between these and the mass produced counterparts. On the subject of cycling there is a brilliant documentary which is on youtube and I have linked it on here where a guy produces his own bike and one of the stops he makes is in the US to get some hand made wheels. Watch the video, listen to the guy and I am sure we will all be putting in a new request to the VMH for a set of wheels from this guy.
@huffalotpuffalot
Oh and 35 minutes 49 seconds in for the section on the wheels, even though the whole programme is definitely worth watching.
@huffalotpuffalot
Thanks for linking that. The book is well worth the read as well.
There seems to be a bit of a resurgence of the hand-built item at the moment that gives some hope for the future. This is a prime example of the desire to get away from the mass produced bike, a frame building academy that has raised the cash required to get up and running by taking pledges fro prospective customers. Currently, they’ve raised 104% of the required money 5 days earlier than their 42 day target.
@Chris
That project is absolutely awesome, perhaps a new Velominati section in the making there. Allowing the members to provide links to worthy causes such as that in the form of an article about it and associated information to help out. I for one will be looking to donate.
@Oli
Actually, I think I owe you an apology! I was looking at the wheel photos, but when I look at the side profile shot of your bike it looks like you’ve got it right – must be a trick of perspective, but sorry for doubting you. Carry on.
@Simon
The above post was meant to be for you, Simon…clearly this is not my night.
@Oli
I thought that Oli, BUT your mistake has brought an important aspect of wheelbuilding that I’d been unaware of to light!
After my cycling sensei reminded me that I’d said I was going to strip my hubs, clean, re-grease and rebuild them, I came straight home from our Sunday ride and got on with it. The front hub especially sounded horrible and I’d found it impossible to get it running nicely by adjusting the cones. Upon inspection the cones and cups have pits that must be causing all the noise. My soution, get a new hub and rebuild the wheel, mostly for the experience as I’ve never built one before but thanks to your post I know just what to do at the valve hole! Thanks.
ps I have new wheels but might keep them till spring, new hub is for a rubbish wheel and I’m on top of a Bianchi hub at 99p with the correct amount of holes.
@Oli
Never built a wheel or anything, but did you mean that there were crossed spokes above the valve? I realize it was a mistake, but what do you mean here?
Nate, Oli, Frank – Sounds good! I think what I’ve distilled from your feedback is 1) give it a shot and try to get them close by measuring But, 2) listen to your body, as feel from the saddle trumps overmeasuring & overanalyzing.
Thanks.
@eightzero
@eightzero
I don’t know if this will help, but I had a very similar situation with my R3 that was driving me crazy. In talking to one of the mechanics at my local shop he suggested that it might be my seat post or saddle since the clicking went away when I would stand. Sure enough after doing a little lube and tightening of those components I have not heard that awful sound since.
@jaja
That is a truly terrifying EPMS. It has already grown its own skeletal structure. Are you concerned it might also grown fangs and claws and attack you? I would be.
@RedRanger
Ah, Good ol’ Servais Knaven, the last Dutch winner of Roubaix! You can also see WIlfred Peeters and Big George Hincapie off there on the left. Great shot! Great year!
http://www.youtube.com/watch?v=3whyot73JRA
@jimmy
The tires will have to come off and be stored in the dark like a fine bottle of wine, but of course the wheels will serve regular duty. It would be a crime not to ride them!
@Oli
@Oli
Oli – despite the fact that he didn’t commit the sin, would you mind explaining what you *thought* he’d done wrong so I can make sure I don’t bugger up my wheels?
@snoov
Why not replace the cones, cups, and bearings?
@Ron
I’ve got another way, get rid of the measuring tape and stop trying to find the center of the BB. I use a piece of wood (like a blank yard stick) I can mark with a pen. With the crank parallel with the seat tube, put the stick on your pedal platform or axle and keeping the front edge of stick aligned with center of the seat post, sight across the top of the saddle and mark the stick there. Assuming you have the same pedals you can get within a mm or two on the next bike.
I bet that made little sense. This measures the total pedal to saddle height distance.
@Simon If Pinarellos still looked this good I would still lust after them. That is a bel mezzo.