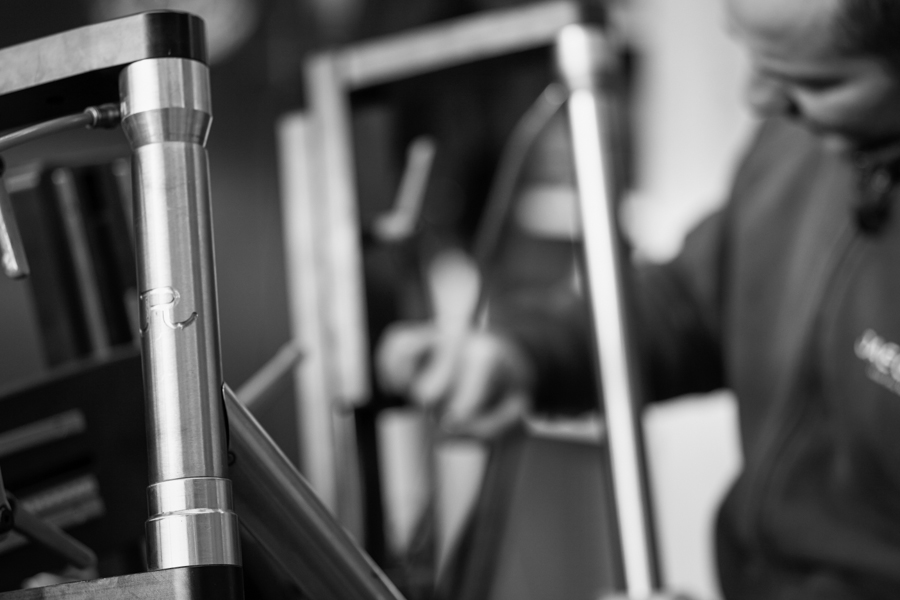
Reverence: 3M Electrical Tape

One of the most cherished bits in my toolbox are the four rolls of 3M Electrical Tape: red, green, white, and black. In the past, I've used off-brands, but those appear to use an adhesive that leaves a gooey residue and the tape itself seems to shrink (especially in heat) as it sits in it's place, quietly serving whatever purpose it has been set forth to serve. While more expensive, it seems the 3M products use a higher quality vinyl that doesn't move around as much once put in place, as well as a better adhesive which leaves behind less of a gooey mess.
Unsurprisingly, each roll of tape serves a different purpose. The black tape is generally used in repairs or for holding things in place while I work on my bike, such as brake and shift cables during the taping of bars. It is also absolutely irreplaceable when it comes to quieting the valve stems in my wheels. I use 80mm valves on my wheels rather than fool about with valve extenders, but the problem with doing that is the stem is just a bit thinner than the hole, and the considerable speed with which my guns propel the bicycle causes them to rattle unpleasantly. The solution is to wrap a small bit of tape around the stem at just the right spot to pinch it into place allowing for observance of the Principle of Silence. (I discovered yesterday that Cervelo TestTeam uses the same approach.)
A hopeless aesthete, The colored tape is used mostly for finishing details – those little things that turn a nicely built bike into the bicycle worthy of worship: an extra strip under the finishing tape of the handlebar wrap, or a loop of tape around the seat post to mark it's height. The color, in these cases, is always very carefully considered, and care is taken in it's application. For example, I spent several weeks deliberating over whether I should use white tape or red tape around my seat post, finally settling on white. Presently, I'm trying to decide if I should use a strip of red finishing tape like I'm currently using, or if I should make the jump to a strip of white. White might be slightly more subtle and classy, but I'm also a trifle concerned that since the bar tape is already white, it might be too understated.
In any case, the decision will not made lightly, and I'll have to update my computer wallpaper and screen savers if I do end up making the switch.
[dmalbum path=”/velominati.com/content/Photo Galleries/frank@velominati.com/Reverence Electrical Tape/”/]
I have rolls and rolls and rolls of the black 3m tape. I will be able to pass it on to my grandchildren. Fantastic stuff
Ooooh. I like that white electrical tape around your seat post. I will have to seek out some red 3m electrical tape for my red/black steel frame Lemond with red bar tape. These seemingly “little” details hold so much promise…
Cool post. I’ve used electrical tape for everything you mentioned – except the valve stem trick – gotta give that try.
@andy
And to my third grandson, I bequeath my 3m electrical tape. Classic.
@KitCarson
Thanks mate, like I said, that was a killer to decide to make the move to the white stuff from the red stuff. I like it too, though. Thanks.
@Dan O
Saul at SpeedyReedy gave me that pointer, it’s a good one; I was stoke to see Cervelo TestTeam use it, too.
One thing there is that it’s a bit tricky to find the right spot to put the tape, because as you inflate the tire, the whole thing moves, so it’s not really obvious where to put it. Experimentation found the right spot, and then I cut a valve stem from an old tube (with an 80mm stem) and marked the spot on that one to use as a template for future applications.
When it comes to electrical tape I usually get anything I can get my hands on. For future reference I will look out for 3M. Btw frank… I want your workshop, I’ve got my student room/corridor, and no bike stand :(
I’m confused. Electrical tape around the seat post to get saddle height right? I take my bike in a box on a regular basis, and as such, take the machine to pieces more frequently than I’d like to put her in my iron case. I have a trusty tape measure that – almost automatically – runs out to 73.5cm, the distance from my seat top to bottom bracket defined by the organic component of my machine. Why therefore, when this simple fix is available to all for little additional travel weight (on scales, my ‘travel’ tape measure is 135g), would you run the risk of aesthetic decay and the carriage of excess weight (literally, SEVERAL mg of weight) that this loop of tape causes? I love 3M tape, don’t get me wrong. My handlebars (under their tape) are covered with the stuff. I cut the reel into thin strips so I can tidy up the ends between my rear forks and the dropouts. All of my bikes have it to tape up their handlebar tape. On both sides. But I don’t waste it on my seatpost. I spent hundreds of Euros on my pmp carbon-fibre stem; I carry puncture repair kit and inner tube in my jersey pocket to avoid saddle bag / rule infringement; and I TRAVEL WITH A SMALL TAPE MEASURE that gives me the ‘little hitler’ satisfaction of complying with Captain Weights’n’Measures when I pass the frame ‘ready for riding’ after assembly. And you are worried about colour? COLOUR? Crack open a keg of Rule #5.
But I do LOVE the valve-stem tape solution (parsed against Cervelo… so cool)
@Nathan Edwards
I fought long and hard for this workshop, and my Velomihottie – just to spite me – hung up a poster of King Khan.
@roadslave
Classic. And good advice. I assume that kegs of Rule #5 are to be kept as with a fine ale, at “cellar temperature”, 12-14C. I usually take my Rule #5 in the form of 11T cogs buttered with Dumonde Tech, so I’m a bit uncertain how the keg version works.
But good heavens, you’re telling me to dope up on my Rule #5 for NOT carrying around a fold-up tape measure?
The bit of tape serves three critical functions:
Ruminate on this, my son.
Pure, unadulterated, classic stuff, this!
“buttered with”…. I’m beaten. Excellent. Can hardly type as a) tears blurring the screen; b) since TdF in the pyrenees, have switched to rioja, and it’s bloody good (particularly this second bottle of gran riserva). to your points:
1) you will still be carrying, literally, SEVERAL mg of extra weight by having your tape remain on your frame
2) I’ve spent many euros buying a sensitive enough torque-wrench that I can get that tightening just right… It’s a little bit goldilocks, I know, but worth it. I don’t have Velominati bib shorts (but I hope to one day), but I do aspire to be able to look down, when in pain, and see etched across my thigh in lycra-stamped machine font (rather than hand-carved scalpel thigh-carved in blood, flesh and meat) Rule #5 instructions…. but god forbid, the tape-end is curling up?! What are you thinking, man? Get a GRIP.
3) agree. good point. (gulp). That’s why I now use lasers.
Perhaps I’m off base but just what is that electronic thing marring your stem?
@Elric Rule #74… though I have to agree with the ‘marring’ bit.